Field Notes
Lawton-Fort Sill Rifle and Pistol Club

This page contains a number of articles from our club newslatters, from the ORA's "Sharpshooter," and from other publications. These articles are all the work of our club members and the rights to them are retained by our club. They have been published elseware by permission. It is our hope that these articles may be helpful to those with a practical interest in our shooting programs.
MBAR Lives; Part One
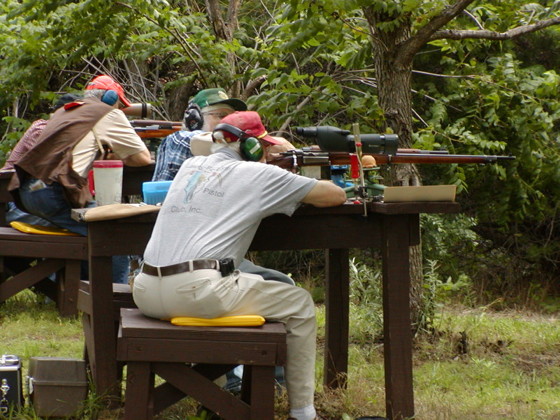
An MBAR match at the Lawton-Fort Sill Rifle & Pistol Club
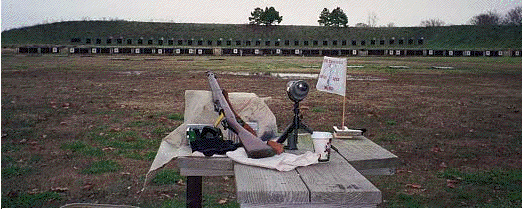
The firing line looked like a reunion of veterans from the Great War of 1914. There was an '03A3 Springfield, an M-96 Swedish Mauser with a 1917 chamber date, an M-39 Mosin-Nagant (hex receiver, returned to service by the Finns in 1941), and an '03 Springfield with a four-digit serial number. Waiting in the second relay was another '03A3, a 91/30 Mosin, a British SMLE, and a US Krag. This is MBAR--Military Bolt Action Military Rifle--competition. The rifles must have once been general issue for the armed forces of a recognized nation, and they must be "as issued" to qualify for competition.
Except for the rifles, MBAR resembles many "bench" matches. Participants are seated, and shoot from a bench using a front and rear rest. Spotting scopes are allowed, and the most common target is the SR-21 at 100 yards. Instead of modern rifles with expensive optics and high-velocity ammunition however, carefully hand-loaded ammunition moves bullets downrange at about 1,800 f/p/s. Even so, ten-shot groups under three inches and scores in the mid-90's are the rule of the day.
Military surplus rifles are seldom ready for MBAR "off the shelf." Selection and preparation of an MBAR rifle is an involved process that requires the participant to master a wide range of shooting-related skills. A careful study of the ballistic characteristics of available cartridges is a good place to begin. Two cartridges dominate the winners' circle: the .30-'06 US and the 6.5x55 Mauser. Close behind those two are other cartridges in the .30-'06 class: the 7.62x54R, the .303 Brit, and the 7.7 Arisaka. Deciding which chambering(s) you are willing to accept will help narrow your field of possible selections. Remember that the best accuracy will require hand-loading, so consider the availability of bullets, boxer-primed brass, and reloading dies..
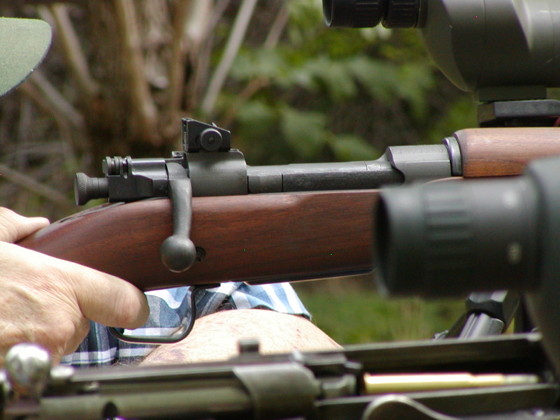
The photo above is a 1903A3 Springfield. It is easily distinguished from the 1903 by its peep sight mounted on the receiver.
f you are new to MBAR or just considering it, the next decision is selecting a rifle. Don't worry too much about how the rifle looks on the outside; your main concerns should be the chambering and the bore. Almost every other problem can be fixed with a little skill and extensive TLC. Unfortunately, many MBAR rifles are purchased at gun shows, estate sales, and pawn shops, where a proper examination of the bore is not practical. At the least, you should be allowed to run a clean patch down the bore, and look at it with a simple bore light. If you go shopping for an MBAR rifle at a gun show, take along a jointed cleaning rod, some patches, a bore light, and a small magnifying glass.
Even in a pawn shop or gun shop where the bores are usually reasonably clean, you want to run a patch down the barrel. Push the patch slowly, with even pressure. If the patch slides smoothly and evenly, that's good. If the patch "hangs up" at some point-- often about 6' from the muzzle--and requires extra force to move it, that may be a sigh of deep, rough pitting. If the patch suddenly moves freely, 'run, do not walk." That usually indicates that the bore is completely "shot out" by hard use, or "blown" by having been fired with a blocked bore.
Check the rifle carefully before making a commitment to purchase. Are all the parts present and usable? Parts for old military rifles are frequently available from national parts suppliers, but even a small part like a screw or a spring may cost $20 or more. Screw heads will often be damaged from over-zealous application of an improper screwdriver, but in many cases they can be built up by welding and then re-cut.
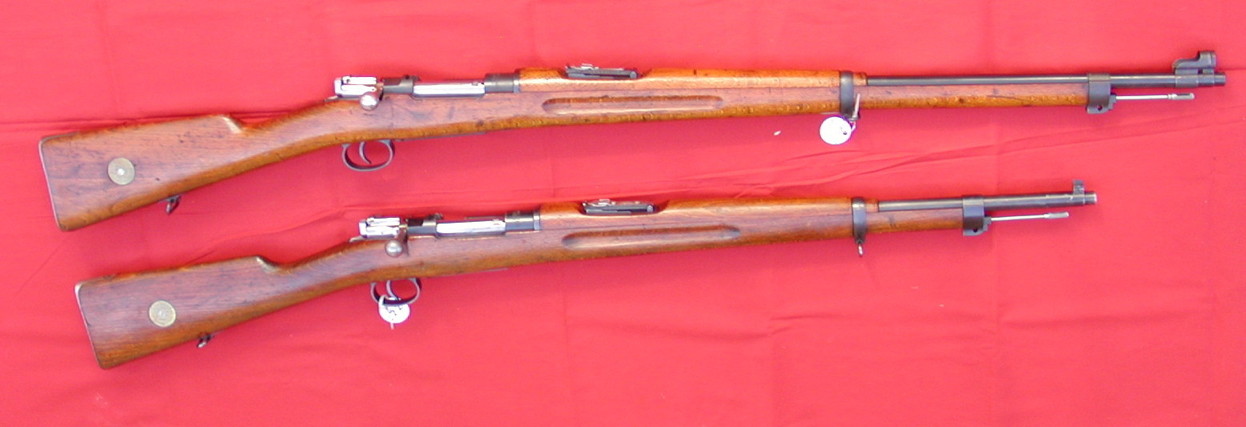
Many M'96 Mausers (top) were cut down to make the M96/38. The M'96 with its longer sight radius is generally preferred.
The stock and hand-guards should be present and either serviceable or repairable. Pay close attention to the action area and the barrel channel. If the stock has a steel "recoil block" it needs to be fixed solidly in the stock; glass bedding is NOT allowed in MBAR rifles.
Once you bring your new acquisition home, the real work begins. Resist the urge to fire the rifle, especially with service ammunition. Remember this rifle is going to be 70 to 100 years old, maybe older. Safety first, shooting second. Begin by disassembling the rifle completely. This may take several hours, days, of even weeks. Rusted-in bolts and pins need to be loosened with solvents and oils, not forced or driven. Knowing how the rifle comes apart may require considerable research. An excellent source and reference is A Collector's Guide to Military Rifle Disassembly and Reassembly (Mowbray and Puleo) from Mowbray Publishing. This heavily color-photo-illustrated book is a "must-have" for every MBAR shooter.
Good M'95 Mausers are not generally available on the surplus market.
Some preliminary cleaning will be part of the disassembly process. In other words, you may need to clean away a century of dried oil and dirt just to get the gun apart! Once the rifle is disassembled, the real task of cleaning begins. Gun solvents like Hoppe's No. 9, automobile solvents like Break-Free, and even old-fashioned kerosene will be useful for cleaning metal parts. Use such solvents only in well ventilated areas, and NEVER use gasoline.
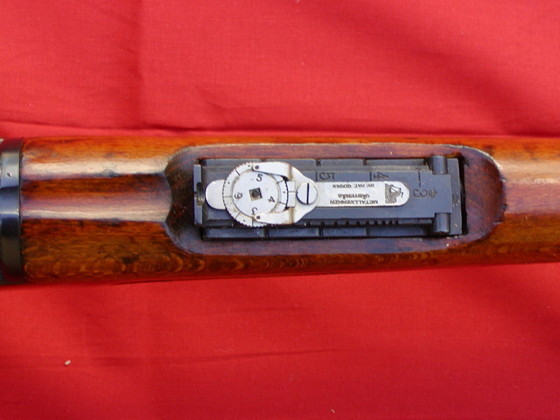
This Swedish-made M96 shows the addition of a "micrometer" adjustment to the rear sight.
Old military stocks should not be sanded as it will remove any markings that have survived. Avoid wood bleaches and finish solvents which may damage the dehydrated wood in favor of hot water and dish washing detergent. (Never immerse the wood parts in water.) Clean the surface wood with an old washcloth dipped in the water; a toothbrush comes in handy for the inletted areas. When there is a heavy "shell" of dried linseed oil, a soft scrub brush works well, and in the most extreme cases a light rubbing with 5x0 steel wool may be necessary. Rinse the cleaned wood with cool water and set it aside to dry.
With the metal parts cleaned and lightly coated with gun oil, and the wood cleaned and dried, we are ready to turn our attention to the bore. Cleaning and refurbishing the bore, however, is a multi-step process which is best left for another time.
"MBAR Lives; Part One" first appeared in the October 2016 issue of "The Sharpshoter," the official publication of the Oklahoma Rifle Association.
MBAR Lives; Part Two
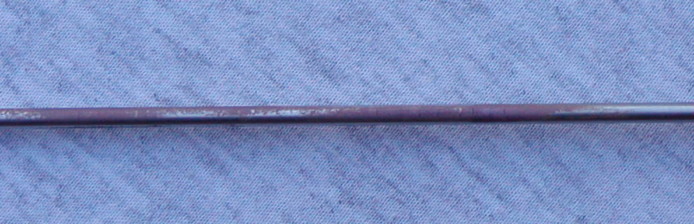
The heart of any rifle is the bore and chamber. While this article deals specifically with refurbishing surplus arms for Military Bolt Action Rifle competition, it is equally applicable to any used rifle purchased at a pawn shop, gun show, or estate auction. Military rifles are often in worse condition than sporting arms. This is the result of a century of corrosive ammunition, battlefield abuse, and improper maintenance.

(above) Although the barrel may look clean and smooth when viewed from the muzzle with a bore light, a borescope shows numerous small pits.
Having cleaned the exterior parts of the rifle (covered in Part One of this series), we are ready to begin cleaning and refurbishing the bore. Step one is to get down to bare metal. That's usually easier said than done.
Begin with the correct size brass brush. "Brass" does not mean nylon or stainless steel. A .30 caliber brush will work for .303 British, .30-’06 US, 7.7 Arisaka, and 7.62x54R. A 6.5 mm brush fits 6.5x55 Mauser and 6.5 Arisaka. Brushes in 8 mm and 7 mm will be required for many European arms..
I use a one-piece cleaning rod that is long enough to extend one inch beyond the muzzle of the rifle without the handle contacting the rear of the receiver. Using a good gun cleaning solvent, the process begins. An effective pattern is five passes: a solvent-wet brass brush, a solvent-wet patch, and three dry patches. The pattern is repeated as often as necessary. Once the bore looks clean, the brass brush is put aside, and the pattern becomes one wet patch followed by three dry patches until the third dry patch comes out clean.
Plug the receiver end of the barrel with a wood dowel. Stand the action upright and fill the barrel with solvent. Let stand overnight. Drain the solvent, remove the plug and clean the barrel again, this time using a nylon or stainless steel brush. (A brass brush may produce a false copper reading.) Inspect the bore. Looking down the bore with a bore light really won't show much. The better way is a bore scope that can show the full length of the barrel. Most barrels will be clean. A few old hard cases will still show material deep in the pits of the grooves. For these, an electronic bore cleaner, commercial or home-made, may be the only answer.

The Outers Foul Out II and III are out of production, but are still available on the used market. For military rifles, the Foul Out II may be easier to use.
Before electronic cleaning, some research is necessary. What was the original military cartridge for the rifle? Was the bullet lead or jacketed? (The electrolyte for brass is different from the one for lead.) Follow the manufacturer's instruction for the particular cleaning device. The electronic bore cleaner will finish taking the bore down to bare steel.
After patches come out clean, deposites of copper and rust remain to be removed by the electronic bore cleaner. The stainless steel "collection rod" shows materials removed from the barrel.
The clean bore should be inspected again. Things usually look pretty rough. It's like the first time the groom sees his bride without her makeup or the wife sees her husband before he shaves. A ten-shot group usually shows that the accuracy of the rifle is now as bad as it can get. If the group is close to eight inches or less, there's hope. The next step cures many ills.
The problem is how to take the sharp edges off some of the pits in the bore. The solution is lapping the bore. There are two ways to lap the bore, but "fire lapping" is the easiest and fastest. This is simplified by using an abrasive kit like the one from Wheeler Engineering and cast lead bullets. (Jacketed bullets will work, but lead works better.)
Determine the actual size of the bore. Use a brass mallet and a 1/4 inch brass welding rod to drive a lead bullet down the barrel from receiver to muzzle. Measure the bullet with a micrometer. (This step may not be strictly necessary for American rifles, but for Russian firearms it is an absolute must.) Next acquire a supply of cast lead bullets of the proper size. If that requires the use of a sizing press, do NOT lubricate the bullets.
The fire lapping process is similar regardless of the kit used. Start with the cutting grit lapping compound. (Remember: grit is like sandpaper; the smaller the number, the courser the grit.) The lead bullets need to be imbedded with the lapping compound. This is done by placing a small amount of lapping compound on one of two steel plates and then rolling the lead bullet back and forth between the steel plates. Do not apply so much pressure that you reduce the diameter of the bullet!
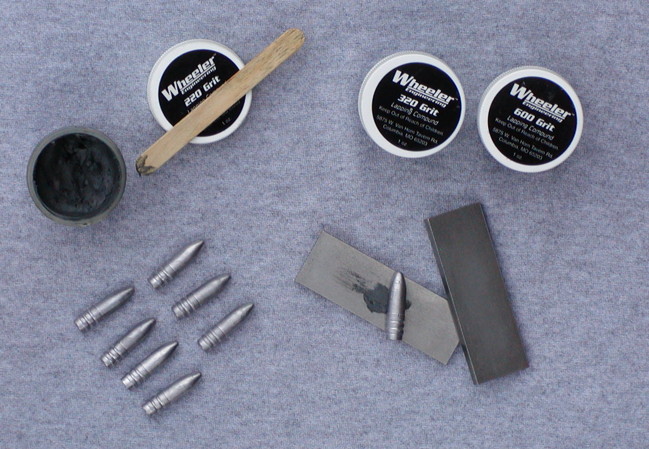
A commercial fire lapping kit facilitates bullet preparation, but does not reduce the meticulous cleaning necessary when changing from one grit to another.
From here on the fire lapping becomes almost mind-numbing in its repetition. Imbed twenty lead bullets with cutting grit. Load them with a light powder charge-- most reloading manuals list “starting data.” Fire them. Clean the barrel as thoroughly as possible with a brush, solvent and patches. Inspect the bore. Repeat the process with the smoothing compound. Repeat the process with the polishing compound. (It doesn't take long to read this paragraph, but the actual fire lapping process may take many hours. Don't take short cuts.)
Once the fire lapping and cleaning is complete, fire a ten shot group and compare it to the earlier group. It may show no change or slight improvement. (At this point I like to see a group of about six inches or less.) Most military rifles are fine old soldiers who respond to proper refurbishing. Others, however, are crotchety old geezers who won't respond to any conventional efforts to improve their performance.
Now the conditioning begins. Get a good supply of inexpensive jacketed bullets, load them up, and start shooting. In most cases the group will begin to shrink after 50 rounds. That's because the pits, smoothed over by the fire lapping, are now being filled in with gilding metal from the bullet jackets. When you clean the rifle from now on, do NOT use a wire brush. (The wire brush will remove the gilding metal from the pits, and you will have to start conditioning the barrel all over again.)
Once you are get ten-shot six-inch groups with starting data and cheap bullets, things are looking good. Now is the time to acquire some match-grade bullets and start working on the optimum loads for the rifle.
Custom hand loads do take time, but it will be time well spent, as we will see later.
"MBAR Lives; Part Two" first appeared in the January 2017 issue of "The Sharpshoter," the official publication of the Oklahoma Rifle Association.
MBAR Lives; Part Three
Many military cartridges have sporting counterparts which are relatively easy to obtain-- always excepting expense. While commercial ammunition may be the least labor-intensive way to feed your military bolt action rifle, it will seldom produce optimum accuracy, which only comes from carefully crafted handloads specifically tuned to your individual firearm. Ammunition components for Military Bolt Action Rifles fall into three general categories which I call "Sesame Street," "Antiques Road Show," and "Mission Impossible."
"Sesame Street" components are easiest to find. Commercial brass (boxer primed) is offered by three or more manufacturers. Loading data lists six or more commercial powders, and match-grade bullets can be had from three or more manufacturers in a variety of designs and weights. Examples are the .30-'06 Springfield (aka .30-'06 US Government), the 6.5x55 Mauser (aka Swedish Mauser), and-- marginally-- the 7.62x54R Russian (aka 7.62x54R Mosin-Nagant).
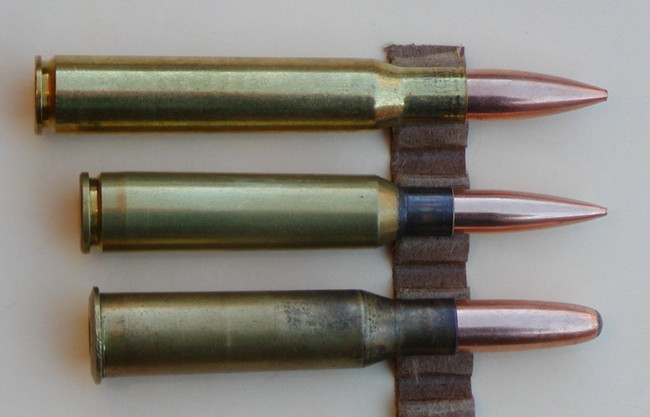
Sesame Street Components: Top to bottom: .30-'06 springfield, 6.5x55 Swedish Mauser, and the 7.62x54R Russian. These three will feed at least ten different MBAR firearms.
"Antiques Road Show" components are not as common and may take some searching to locate. Commercial brass (boxer primed) may only be available from foreign manufacturers or may only be available for a few months each year. Loading data may not be readily available, or may list only a few powders which, in turn, may have to be ordered from national distributers. (Can you say "HazMat fee"?) Be prepared to spend some time hunting for these supplies. Examples include the .303 British, the 6.5x50mm and 7.7mm Arisakas, (aka the 6.5mm and 7.7mm Japanese) and the 7mm and 8mm Mausers (aka 7x57mm and 8x57JS).
"Mission Impossible" components are not usually available on the retail market. Producing brass may require skills such as annealing, multi-stage case forming, and miniature machining. Loading data will have to be developed from the interpolation of original military specifications, and bullets will have to be cast, sized, and lubricated, often with the addition of gas checks. Examples include the 7.65 Argentine Mauser and the 11 mm Mauser.
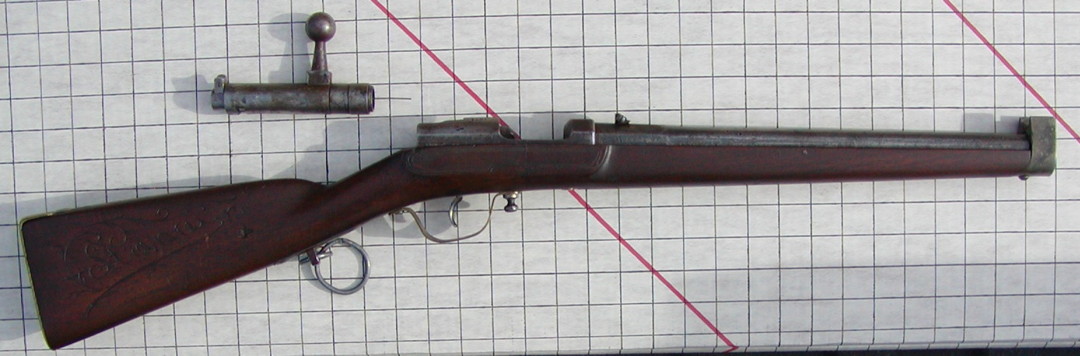
Mission Impoissible! While it qualifies for MBAR, the Dreyse "neeedle gun"-- shown here with the bolt removed-- requires a combustible cartridge with a compressed paper sabot and the primer located inside the cartridge, on top of the powder charge. (from the Ray Jackson collection)
Components for the .30-'06 Govt. are by far the easiest to find. Although large supplies of US military surplus ammunition have dried up, military brass is still available at many gun shows, and commercial brass is produced by all major American manufacturers. US military brass will be boxer primed (very important) and will not have been fired with corrosive primers. It will require more preparation for reloading than does commercial brass because the primers have been crimped in. That means that a circle of the brass surrounding the base of the primer cup has been pushed in around the primer to hold it securely in place. Because of this crimp, more force is required to remove the original primer than is usually the case with commercial ammunition.
The crimp must be removed before a new primer can be safely inserted into the primer pocket. There are two ways to do this: cut the crimp out with a primer pocket reamer (which removes brass) or swag the crimp back into the cartridge base using a primer pocket swager tool (which does not remove brass). Swagger tools are not prohibitively expensive, mount in any standard O-frame reloading press, and, IMHO, yield results worth the cost.
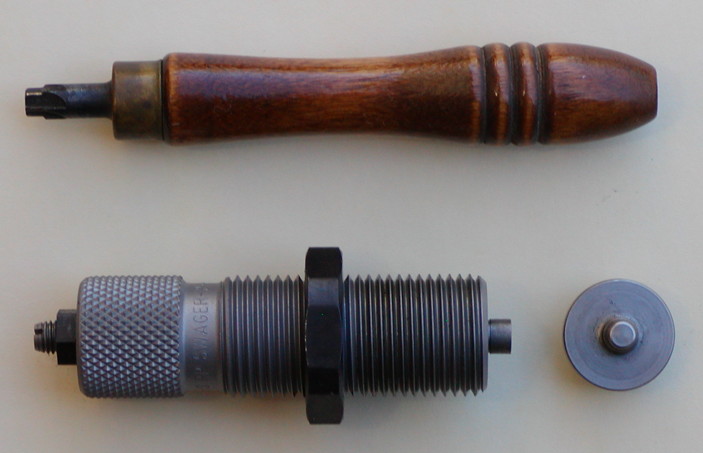
Military rifle brass has a crimp ring around the primer. This crimp must be removed before such brass can be reloaded, either cut out with a primer pocket reamer (top) or swaged out with a swagger tool (bottom) mounted in a loading press.
Bullets suitable for loading in the .30-'06 are available from any commercial source because they are the standard .308 diameter used in every American .30 caliber cartridge from the .30 US M1 Carbine to the .300 Winchester Magnum. More important for MBAR shooters, bullet manufactures offer match-grade bullets in a number of weights and designs.
The 6.5x55 (Swedish) Mauser round is not as common as the venerable .30-'06, but components are readily available. Although small lots of Swedish military ammo are sometimes offered at gun shows and on the internet, even when the components are non-corrosive the cases use berdan primers and are useless for reloading. Fortunately, new commercial brass using boxer primers is available from both American and European sources.
Similar in one way to the .30-'06, the 6.5x55 uses bullets common to other cartridges. Bullets for the 6.5 are .264 diameter and are also correct for the 6.5x50 Arisaka, the 6.5 Remington Magnum, the .264 Winchester Magnum, and the 6.5x300 Weatherby.
More effort is required to get good quality brass for the 7.62x54R Russian. "Best quality" brass is easy to find; both Norma and Laputa are readily available, although you will pay more than a dollar a round for it. I have heard rumors of Winchester brass being on the market in limited quantities, but I have never been fortunate enough to find any. In most cases, shooters stop looking for brass, and simply purchase Winchester, Sellier & Bellot, or Prvi Partizan factory loaded ammunition. (Prvi Partizan brass is sometimes available, but you won’t save much over the loaded ammo.) Ammunition from all three of these suppliers is boxer primed and suitable for reloading. (Do not even think about trying to reload berdan-primed steel cases.)
7.62x54R rifles will fire .308 bullets and some reloading manuals list data for this. The correct bullet diameter for 7.62x54R firearms is .311. Internal pressure will be higher with .311 bullets than with .308 bullets over the same powder charge. That said, if you are working with a Russian 1891 or a 91/30, the bores range from .308 to .312, and you will need to “slug” the barrel to find out what bullet will work best. (SAFETY NOTE: There is a 7.62x54R and a 7.62x39. Some loading manuals will give data for only one cartridge which they call the “7.62 Russian.” Check case dimensions to determine which cartridge is intended.)
The family of cartridges I called "Antiques Road Show" will be easy to get bullets and loading data for, once you have secured a adequate supply of usable, boxer-primed brass. New, boxer-primed brass is available for the five cartridges I listed for this category.
Surplus military ammunition is not worth the effort. First, despite what you may read in "Firearms News" ads, there is no such thing as "mildly corrosive." Second, while it is theoretically possible to modify berdan-primed brass to take boxer-primers, you must first get the berdan primer out (without detonating it), and then you will need a miniature lathe (a drill press won’t work), the skills of a master machinist, and unlimited time.
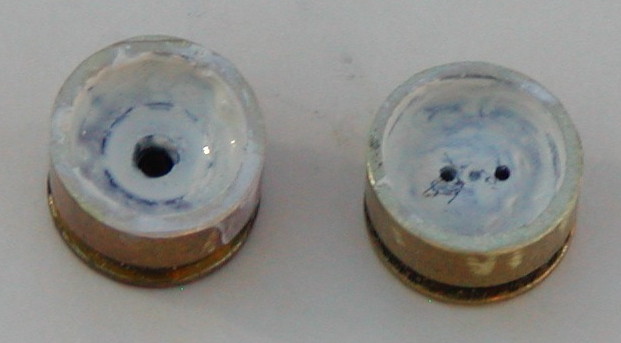
Boxer-primed cartridges (right) have a single large flash hole located in the center of the cartridge base. Berdan-primed cartridges have two small flash holes located off center, and often use corrosive primers.
Loading data is available for all five of these cartridges. The .303 British and the 7.7mm Arisaka use the same .311 bullets already discussed for the 7.62x54R. The 6.5mm Arisaka uses the same .264 bullets as the 6.5x55 Swedish Mauser. Bullets for the 7mm Mauser are .284, the same bullet used in the .284 Winchester, the .280 Remington, and the 7mm Remington Magnum. Most 8mm Mausers use .323 bullets, but carefully slug and measure your rifle’s barrel first. There are TWO 8mm Mauser cartridges; the 8x57J must have a .318 bullet, and must NEVER be fired with the .323 bullets used in the 8x57JS.
In working up "accuracy loads" for MBAR firearms, we need to keep in mind that many of these old soldiers have passed the century mark. As long as optimum accuracy is obtained, lower and slower is always better (safer) than flat and fast.
"MBAR Lives; Part Three" first appeared in the April 2017 issue of "The Sharpshoter," the official publication of the Oklahoma Rifle Association.
MBAR Lives; Part Four
As we come to the final article in this MBAR series, there are some things that should already have been accomplished. You have a qualifying Military Bolt Action Rifle, you have it cleaned up completely, and you have a supply of loading components. The final stage is to tailor the loads to get the best accuracy of which the rifle is capable. Developing match loads for a modern bench rest rifle will test a shooter's skill and patience, but developing match loads for a century-old military long arm, worn from a century of use and abuse, presents an additional challenge.
Building a winning load begins with careful inspection of the brass. If you have any doubt that your cases are brass, test them with a magnet. (With the 7.62x54R, copper-washed steel cases are common.) Discard any cases that have cracks in the necks or that are badly dented. If there is any corrosion on the surface, clean the brass in a tumbler or vibration case cleaner. (NEVER use Brasso on cartridge brass.)
Once the brass is clean, it needs to be full-length sized. This is true even if you are using new factory brass. Most sizing dies also remove the spent primers in this stage, if they were not removed earlier.
Removing military primer crimps was covered in part three of this series. Now, except for new factory brass, primer pockets should be cleaned using a wire brush (usually "large") made for that purpose. The primer flash hole is cleared of flashing on the inside of the case using, again, a special tool. (Some European companies drill the flash hole, but most American manufacturers punch the hole through, leaving considerable "flashing" inside the case.)
The cases are now ready to resize, but it is a good idea to wipe them off with a soft cloth to remove any polishing medium left from cleaning them. Polishing medium is actually a fine abrasive, and it is not good for the inside of sizing dies. Lubricate the outside of each case with a commercial case lube or sizing die wax. Liquid case lube is usually put on a clean stamp ink pad and the case rolled on it. Sizing wax is usually applied with the fingers. Aerosol spray case lubes were very popular several years ago-- less so now. The problem is the aerosol lube tends to find its way into the interior of cases, playing havoc with primers and powder charges.
The first time brass cases are loaded for a particular rifle, they should be full-length resized. Once cases have been fire-formed to the chamber of a particular rifle, they should be set aside for use in that rifle and neck-sized only. (Many shooters do not load cases for competition until they have been fire-formed.)
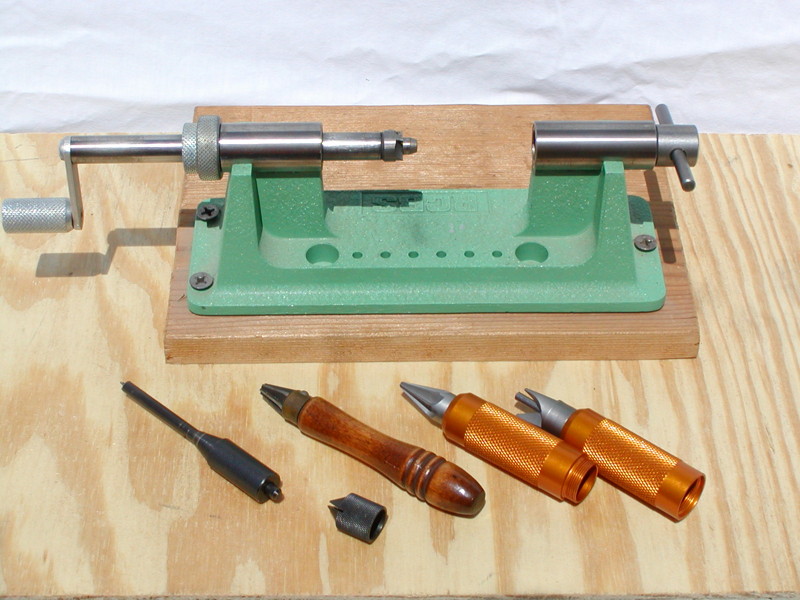
Cases are sized (and resized) and then prepared for loading. Top: Case trimmer. Bottom, left to right, a tool to remove burrs from the interior of the flash hole and a variety of tools to chamfer the case mouth.
The next step in cartridge preparation is to trim the case to length. Any good reloading manual will list the “trim-to-length” in thousandths of an inch. Equipment for this stage ranges from hand-held trimers to powered trimmers that resemble a small metal lathe. After trimming, the mouth of each case should be chamfered on both the inside and outside edges to remove any burrs left behind by the trimmer cutting head. If the bullets you will use have at least a three-quarter metal jacket you are ready to start loading. If you intend to use cast bullets, even those with gas check seals, it will be necessary to expand ("bell") the mouth of the case.
The next step is to set the primers. This can be done with a press, but many MBAR shooters prefer to use a hand primers which they say allows them to "feel" when the primer is fully seated. "match grade" primers are manufactured to a closer tolerance than regular large rifle primers, but in the majority of MBAR rifles they will not be worth the extra expense.
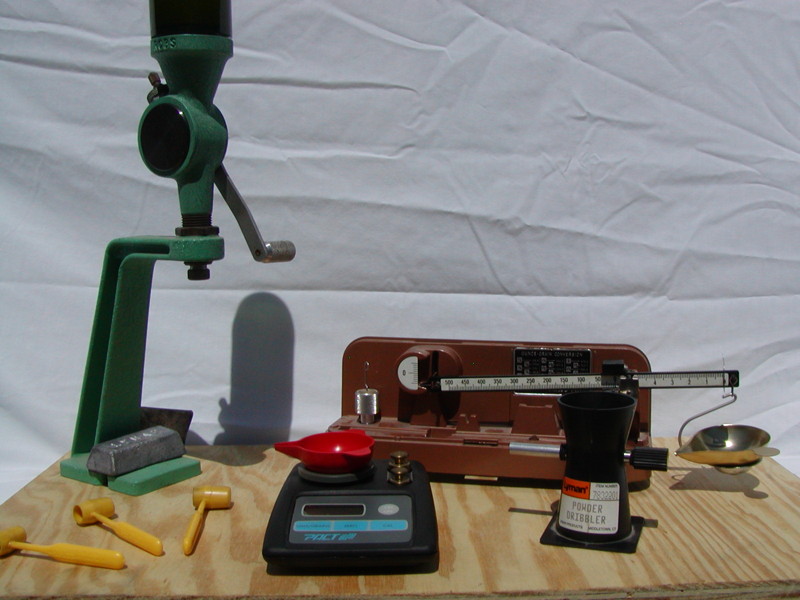
Tools which measure powder by volume (left) are not accurate enough for target-quality reloads. Scales (right) weigh each charge, slower but much more accurate.
Powder charges should always be measured by weight, never by volume. Using either a balance beam or an electronic scale, begin with a slightly light amount of powder and then "trickle" additional powder until the desired charge is reached. Always stop adding powder as soon as the scale indicates the correct weight has been reached.
If, after actual testing, you find that a reduced load fails to ignite uniformly, this is the stage of loading subsequent ammunition where you would add filler. ["Filler" is a non-combustible substance used to fill the space between the top of the powder and the base of the bullet for the purpose of holding the powder against the primer.] The filler should be a fine granular non-abrasive material such as corn meal. Never use a fiber filler such as Dacron in a bottle-necked cartridge.
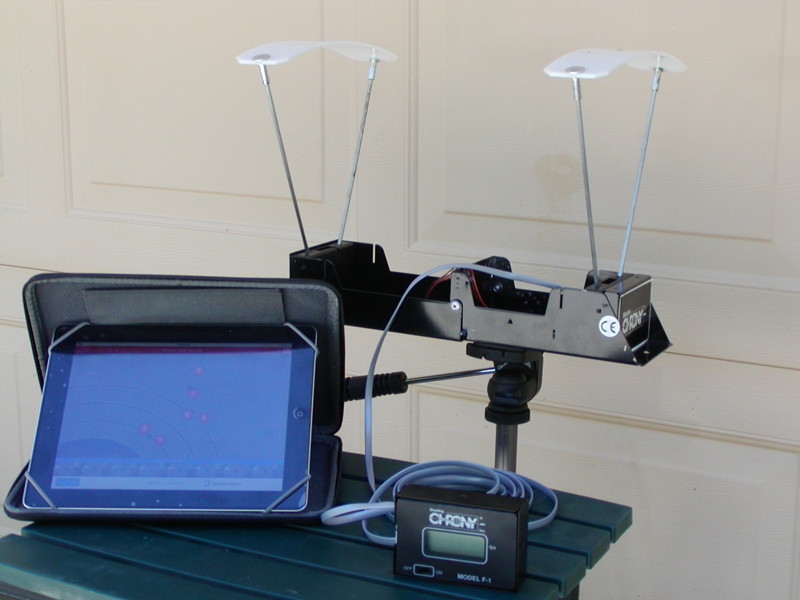
Twenty-first Century technology has reached the shooting bench. Bullet velocity is measured by a chronograph, while group size and location is displayed and stored on a laptop or tablet.
Bullets should be weighed before loading. If there is more than 0.2 grains difference between bullets, group the bullets in sets of ten according to relative weight. Keep the loaded cartridges in the same sets as you finish them. Bullets must be seated to the same depth. Most dies seat bullets according to overall cartridge length (OAL), so it is important that all cases be trimmed to the same length as discussed earlier. Because MBAR shooters load and fire one cartridge at a time, it is not necessary for the cartridges to feed through the magazine. This allows the bullets to be seated forward, beyond what loading manuals call "maximum cartridge length," thus reducing bullet "jump" from the cartridge mouth to the rifling in the barrel.
There is not enough space in this article to answer the question of "to crimp or not to crimp." As a very general rule, if the bullet does not have a cannelure (aka crimping groove), do attempt to crimp the case mouth. If the bullet does have a cannelure, you may crimp or not, depending on what produces the best accuracy on paper downrange.
Once you have your first set of test cartridges loaded, you're ready to head to the range. Record the air temperature. (Powder and air temperature affect bullet velocity.) The ideal day will have little or no wind, but almost certainly less than 7 mph.
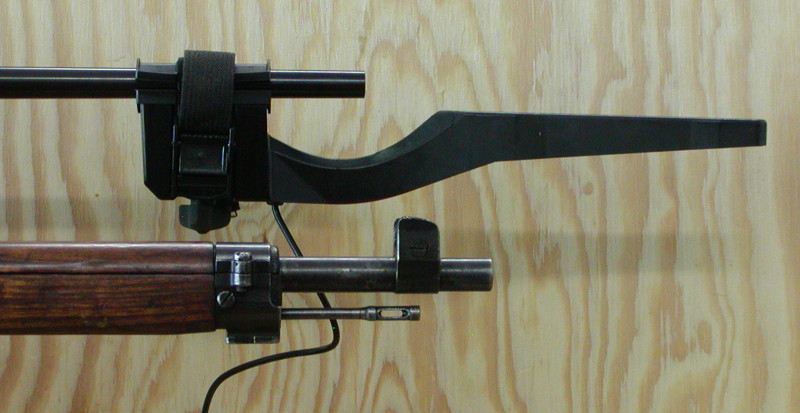
Barrel mounted chronographs are quick to mount and easy to use on many sporting rifles. Most military rifles do not have enough exposed barrel-- even with the cleaning rod removed-- to accommodate the mounting pads. Top: A MagnetoSpeed Sporter ballistic chronograph mounted on a Ruger M-77 stalker. Below: A Mosin M-39 by Sako.
If you have a way to measure bullet velocity, such data is of considerable value because it can show the variations in velocity produced by changes in powder types and charges, fillers, temperature, seating depth, crimping, and other controlled variables. For MBAR rifles, a tripod mounted chronograph usually works better than one of the newer models which mount on the barrel of the rifle. (The sight armor and bayonet lugs get in the way.)
You will be measuring the size of ten-shot groups. (In MBAR, three shot groups don't mean much.) Keep detailed and accurate descriptions of every test load and how it performs. Such records prevent having to load and test the same data at a later date. (Notebook paper is much cheaper than primers, powder, and bullets.) Good luck and good shooting!
"MBAR Lives; Part Four" first appeared in the July, 2017 issue of "The Sharpshoter," the official publication of the Oklahoma Rifle Association.
Jack Oak's Farm
Most shooters sometimes dream of having their own range, but only a very few are able to turn that dream into a reality. One of those fortunate few is Jack Oak, the owner of what he likes to call "Oak Farm," a 35 acre plot of land complete with a 100 yard pistol/rifle range and a 40' x 53' recreation and meeting hall.
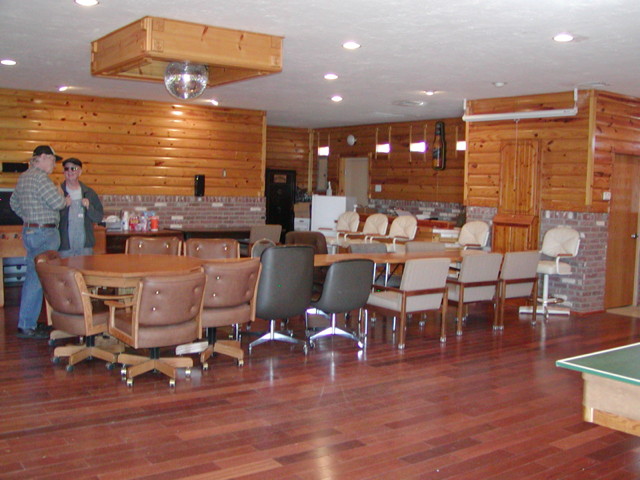
The Meeting/Recreation Hall can accomdate groups of 60 persons in comfort, and has been used by the ORA Board.
In February the ORA Board of Directors met at Jack's farm for their first quarterly meeting of the year. The weather was good, and it was possible to see most of the farm's attractions, from the feeding of the llamas, to the grand piano, to-- of course-- the reactive steel targets on the pistol range.
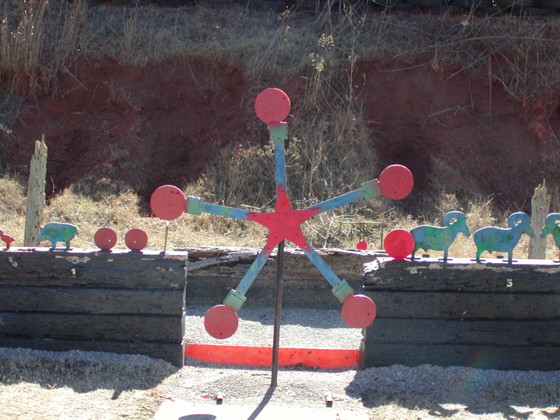
The many reactive steel targets are great fun when shot with .22rf or low velocity lead pistol bullets.
Oak Farm began life in the early 1990's when Jack purchased a 60 acre tract of land north/northeast of Amber, Oklahoma. He sold off several acres and retained the remaining 35 acres for his own use. He built a modest home on the property and then brought in heavy equipment to cut into an existing slope, creating the range, picnic, and pond areas.
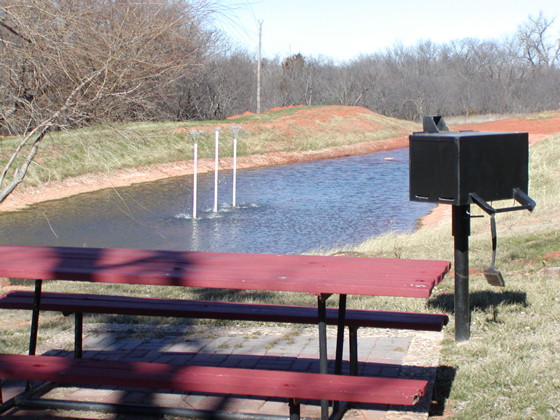
Oak Farm has a pond and a picnic area to enjoy in nice weather.
As the present activity areas began to take shape, Jack's wife Marca cut and laid the brick walkways that connect the farm's various sites. Always an avid shooter, Jack built an eight station handgun range with concrete walks laid out to accommodate both police pistol and conventional bullseye competitions.
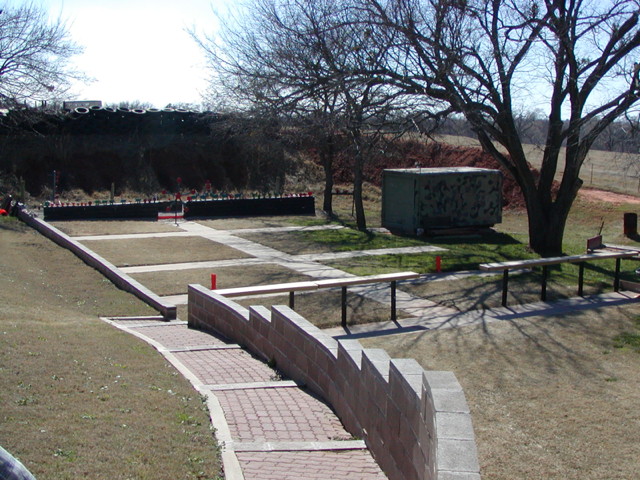
Carefully crafted walkways give all-weather access to the pistol range.
In addition to his many friends, Jack makes his range available to several local law enforcement agencies for their annual qualification and training requirements. Perhaps most important to ORA members, Jack is willing to share not only his remarkable facility, but to share the information and knowledge he has gained from his many years of shooting.
"The worst day on the range is still better than the best day at the office." Joe Charles
Return to Club Home Page